Earn Dollar From Advertisement site as a publisher (Only need a free website)
Dear website owner who has a free website(blogger,Hubpages,web,weebly),they can earn so dollar only show ads (google adsense,chitika, bidvertiser ads ) in your site .After sing up these site ,you need add your free site in advertisement site & put down ads code in your own site.If any visitor clicks
in your ads ,you earn dollar.Your payment (earning dollar ) collected by check/bank transfer so easily.

How to create a Chitika publisher account ?(কিভাবে Chitika বিজ্ঞাপন সাইটে account তৈরী করা যায় ?)
Step 3 : After fill up Click Submit Button
Once you’ve completed your application, you’ll need to confirm your email. Shortly thereafter you’ll receive an email telling you that your account has been approved. Log in to your Chitika account with your new account to proceed.
Step 4: Click ad setup to create your first ad.

Step 5: Customize Your Ad Options
A number of options will appear on the left hand side of your screen, along with a preview on the right hand side of your screen


Your channel is an important setting to pay attention to. It’s basically a description. You can sort your channels later by channels, which will allow you to get more advanced reporting from the Chitika system.
Basically, the channel should be a factor you’re trying to test out. For example, “Left Sidebar” channel might be applied to all the ads you put in the left sidebar. Later, you can sort by the “Left Sidebar” channel to see how all the left sidebar ads did as a group.
The format determines the size and display method of the ad. Type rotates between the different types of ads, including mobile ads.
Fallback options are basically what the ad will do
The colors set the color scheme.
Step 6: Click Get Code
A preview of what a display unit looks like will appear. Click on Get Code to continue.

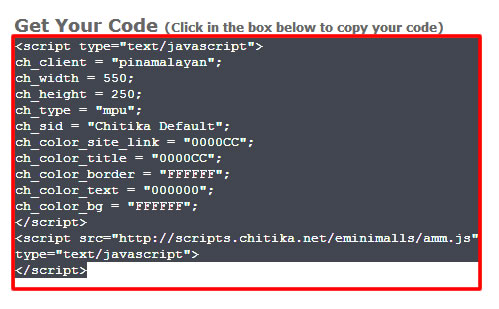
Step 7: Copy Code and Upload
The HTML code will update in real time as you make changes to the options box. Copy and paste the code into your site HTML editor and upload it to have the ad go live.
Your first ad is up and running! If you want to put more ads up, just repeat this simple process.
Step 8: Basic Reporting
Basic reporting is shown in the dashboard of the Reports tab.

Step 9: Advanced Reporting
Click on Advanced Reports to access the advanced reporting options.

In this screen, you’ll be able to sort your ads according to the channels that you assigned to them when you setup your ads.
You can also sort by date range and choose to view ads from specific days or time ranges, or even data all the way from the beginning of your account.


Once you’ve selected all your options, hit submit to view your custom report.
There you have it! That’s how to sign up for a Chitika account, setup a Chitika ad, view your statistics in a glance and get more advanced stats.
Step 10 : Payment

by check

by paypal

For more payment proof
বাংলায় পড়তে ক্লিক করো
Dear website owner who has a free website(blogger,Hubpages,web,weebly),they can earn so dollar only show ads (google adsense,chitika, bidvertiser ads ) in your site .After sing up these site ,you need add your free site in advertisement site & put down ads code in your own site.If any visitor clicks
How to create a Chitika publisher account ?(কিভাবে Chitika বিজ্ঞাপন সাইটে account তৈরী করা যায় ?)
Step 1 : Click here
Step 2 : Follow below part
First Name* : example Rovert (If your name Rovert Brown)
First Name* : example Rovert (If your name Rovert Brown)
Last Name * : Brown
User Name * : as your wish example : mustafezur390 (my username)
It is so important for sing in /enter your account.
---Box--- * : Put your Password in the blank box example 1234567abc
---Box--- * : Put your Password in the blank box example 1234567abc
Website * : your website name example : http://earnsodollar.blogspot.com/
Email address* : example mustafezur390@gmail.com (if you don't have a email ,please click here)
functioning * ৴
My website is owned by me or my company* ৴
My website is owned by me or my company* ৴
My website does not contain objectionable content * ৴
I will not place Chitika tags on a torrent or other download site*৴
I will not place Chitika tags on a torrent or other download site*৴
I will not place Chitika tags on sites that incentivize users toclickads ৴
I accept Chitika's Terms & Conditions * ৴
I would like to receive periodic news updates from Chitika. ৴
CAPTCHA* : enter your captcha which shown in the box
I accept Chitika's Terms & Conditions * ৴
I would like to receive periodic news updates from Chitika. ৴
CAPTCHA* : enter your captcha which shown in the box
Step 3 : After fill up Click Submit Button
Once you’ve completed your application, you’ll need to confirm your email. Shortly thereafter you’ll receive an email telling you that your account has been approved. Log in to your Chitika account with your new account to proceed.
Step 4: Click ad setup to create your first ad.
Step 5: Customize Your Ad Options
A number of options will appear on the left hand side of your screen, along with a preview on the right hand side of your screen
Your channel is an important setting to pay attention to. It’s basically a description. You can sort your channels later by channels, which will allow you to get more advanced reporting from the Chitika system.
Basically, the channel should be a factor you’re trying to test out. For example, “Left Sidebar” channel might be applied to all the ads you put in the left sidebar. Later, you can sort by the “Left Sidebar” channel to see how all the left sidebar ads did as a group.
The format determines the size and display method of the ad. Type rotates between the different types of ads, including mobile ads.
Fallback options are basically what the ad will do
The colors set the color scheme.
Step 6: Click Get Code
A preview of what a display unit looks like will appear. Click on Get Code to continue.
Step 7: Copy Code and Upload
The HTML code will update in real time as you make changes to the options box. Copy and paste the code into your site HTML editor and upload it to have the ad go live.
Your first ad is up and running! If you want to put more ads up, just repeat this simple process.
Step 8: Basic Reporting
Basic reporting is shown in the dashboard of the Reports tab.
Step 9: Advanced Reporting
Click on Advanced Reports to access the advanced reporting options.
In this screen, you’ll be able to sort your ads according to the channels that you assigned to them when you setup your ads.
You can also sort by date range and choose to view ads from specific days or time ranges, or even data all the way from the beginning of your account.
Once you’ve selected all your options, hit submit to view your custom report.
There you have it! That’s how to sign up for a Chitika account, setup a Chitika ad, view your statistics in a glance and get more advanced stats.
Step 10 : Payment
by check
by paypal
For more payment proof